Connect Create® 3 to NVIDIA® Jetson™ and set up ROS 2 Galactic
Important
This is community-submitted content. Please feel welcome to submit PRs for additions or corrections.
Before you start
Attention
These directions are written for someone with experience with embedded Linux and basic embedded computers.
It is highly recommended to read through the getting started document for your NVIDIA® Jetson™ developer kit before beginning:
- Jetson Orin Nano Developer Kit Getting Started Guide
- Getting Started With Jetson Xavier NX Developer Kit
- Getting Started with Jetson Nano Developer Kit
- Getting Started with Jetson Nano 2GB Developer Kit
Setup Overview
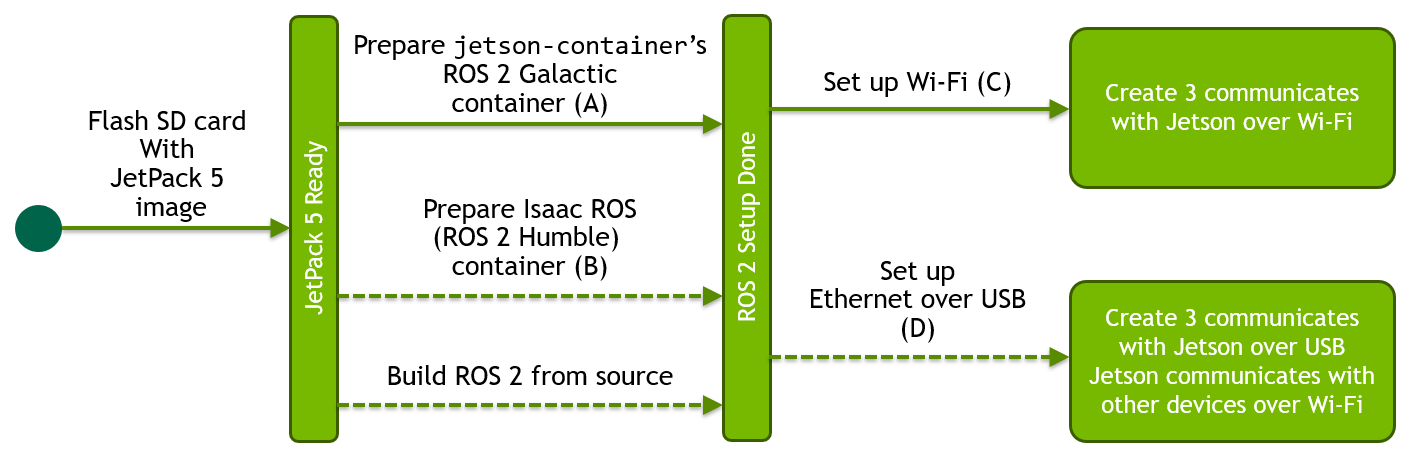
ROS 2 Setup on Jetson
Use pre-built ROS 2 Docker container
The recommended way to run ROS 2 on Jetson is to use pre-built Docker container images.
-
Install NVIDIA Container Runtime with Docker integration
It should be a part of JetPack, so if you use a NVIDIA supplied JetPack 5 image to flash your SD card, you can skip this process.
sudo apt update sudo apt install nvidia-container -
Make docker command available without
sudosudo systemctl restart docker sudo usermod -aG docker $USER newgrp docker -
Set
nvidiaas thedefault-runtimefor Docker.Edit
/etc/docker/daemon.jsonto be the following.{ "runtimes": { "nvidia": { "path": "/usr/bin/nvidia-container-runtime", "runtimeArgs": [] } }, "default-runtime": "nvidia" }
A. Use jetson-containers ROS 2 Galactic container
Dustin Franklin's jetson-contianers GitHub repository provides all the pre-built Docker container images for machine learning and ROS.
-
Use
jetson-containers' script to simplify the invocation ofdocker runcommand.git clone https://github.com/dusty-nv/jetson-containers/ cd jetson-containers scripts/docker_run.sh -c dustynv/ros:galactic-desktop-l4t-r35.3.1 -
Inside the container, install additional ROS 2 packages
apt update && apt install -y ros-galactic-irobot-create-msgs
B. Use Isaac ROS (ROS 2 Humble) container
Attention
If you chose and performed the above "Use jetson-containers ROS 2 Galactic container", you can skip this section
NVIDIA Isaac ROS is a collection of hardware-accelerated, high performance, low latency ROS 2 packages that runs on and leverage the power of Jetson.
It comes with a ROS 2 Humble based container, so if you plan to test/use any of Isaac ROS packages, running the Issac ROS container may be a good option.
E. Build ROS 2 from source
Attention
If you chose and performed the above "Use jetson-containers ROS 2 Galactic container", you can skip this section
Jetson's BSP (JetPack 5) is based on Ubuntu 20.04.
Debian packages for ROS 2 Humble are currently only available for Ubuntu Jammy (22.04), so you would need to build from source if you need to natively install ROS 2 on Jetson.
Communication mode
C. Setup Wi-Fi connections.
If you don't need wired communication between Create® 3 and Jetson™, letting them communicate over Wi-Fi is easier than setting Ethernet over USB.
Create® 3 Wi-Fi setup
Follow the main guide (https://edu.irobot.com/create3-setup) to connect your Create® 3 to your wireless AP.
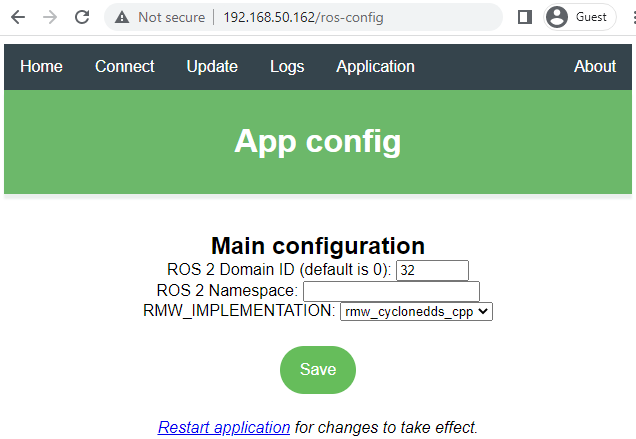
Once you connect Create® 3 robot to your wireless AP, and find out the new IP address assigned to your robot, you can access the robot web dashboard by the new IP address.
If you plan to operate multiple Create® 3 robots in the same wireless network, it is a good idea to set "ROS 2 Domain ID" on the "Application" > "Configuration" page.
Jetson™ Wi-Fi setup
If you have your Jetson connected to a display monitor ("Monitor-attached" Mode), use the Ubuntu's GUI to setup Wi-Fi connection (official guide).
If you cannot easily attach a display monitor to your Jetson, check this guide for "Headless Mode".
Test inside Jetson ROS container
Perform the following in the ROS 2 container.
-
Set the
ROS_DOMAIN_IDenvironment variableOnce you are in container:
export ROS_DOMAIN_ID=32 -
Check to ensure Create® 3 topics appear
ros2 topic listYou should get
/battery_state /cmd_audio /cmd_lightring /cmd_vel /dock /hazard_detection /imu /interface_buttons /ir_intensity /ir_opcode /kidnap_status /mouse /odom /parameter_events /rosout /slip_status /stop_status /tf /tf_static /wheel_status /wheel_ticks /wheel_vels -
Check if it reads a message on a topic
ros2 topic echo battery_stateYou should see continuous repetition of output like the following.
header:
  stamp:
    sec: 1683568887
    nanosec: 488023084
  frame_id: ''
voltage: 16.56999969482422
temperature: 36.95000076293945
current: 0.5609999895095825
charge: 2.075000047683716
capacity: 2.1500000953674316
design_capacity: 2.1500000953674316
percentage: 0.9700000286102295
power_supply_status: 0
power_supply_health: 0
power_supply_technology: 0
present: true
cell_voltage: []
cell_temperature: []
location: ''
serial_number: ''
---
D. Set up Ethernet over USB
Attention
If you chose and performed the above "Setup Wi-Fi connections", you can skip this section.
If you need a reliable wired communication between Create® 3 and Jetson™, you can connect them via a USB cable and let them establish a virtual Ethernet connection over the USB data communication.
Jetson's upstream USB port (USB-C for the case of Jetson Orin Nano Developer Kit and Micro B for the case of Jetson Xavier Developer Kit) is conveniently set up in such a way to present a virtual network card to the host system, so Create® 3 and Jetson can form a virtual Ethernet connection over the USB link.
However, because Create® 3 expects the client device to have a specific IP address (192.168.186.3), we need to tweak the Jetson's "USB Device Mode" functionality, that is designed to run a DHCP server on Jetson side to assign IP address to other device by default.
Alter "USB Device Mode" to apply static IP
-
To alter the Jetson's "USB Device Mode" feature (specifically, disabling DHCP server and self-assign a static IP address);
-
First, create a flag file to store IP address for Jetson to be used with Create® 3.
sudo bash -c 'echo "192.168.186.3" > /opt/nvidia/l4t-usb-device-mode/IP_ADDRESS_FOR_CREATE3_ROBOT.conf' -
Then, modify the "nv-l4t-device-mode-runtime" service script (
/opt/nvidia/l4t-usb-device-mode/nv-l4t-usb-device-mode-runtime-start.sh). The complete file is here.
-
-
Connect USB cable from Create® 3 robot to the upstream USB port of Jetson. Then check if the static IP address is set by issuing
ifconfigcommand.$ ifconfig l4tbr0 l4tbr0: flags=4163<UP,BROADCAST,RUNNING,MULTICAST> mtu 1500 inet 192.168.186.3 netmask 255.255.255.0 broadcast 192.168.186.255 inet6 fe80::1 prefixlen 128 scopeid 0x20<link> inet6 fe80::ecb6:edff:feac:7dd5 prefixlen 64 scopeid 0x20<link> ether ee:b6:ed:ac:7d:d5 txqueuelen 1000 (Ethernet) RX packets 169 bytes 36206 (36.2 KB) RX errors 0 dropped 0 overruns 0 frame 0 TX packets 1644 bytes 213306 (213.3 KB) TX errors 0 dropped 0 overruns 0 carrier 0 collisions 0Warning
Be sure that the USB/BLE toggle on the robot's adapter board is set to the USB position.
-
Check if you can ping Create® 3 robot
ping 192.168.186.2Note
If you ever want to stop using the Jetson device for Create® 3 and re-enable the original USB Device Mode feature (so that you can connect to your Windows PC in headless style), you can simply remove the flag file, or execute the following.
sudo mv /opt/nvidia/l4t-usb-device-mode/IP_ADDRESS_FOR_CREATE3_ROBOT.conf /opt/nvidia/l4t-usb-device-mode/IP_ADDRESS_FOR_CREATE3_ROBOT.conf.bak
Test the USB link inside the container
s in the ROS 2 container.
-
Set the
ROS_DOMAIN_IDenvironmental variableOnce you are in container;
export ROS_DOMAIN_ID=32 -
Set the default network interface by setting Cyclone DDS configuration.
export CYCLONEDDS_URI='<CycloneDDS><Domain><General><NetworkInterfaceAddress>l4tbr0</NetworkInterfaceAddress></General></Domain></CycloneDDS>' -
Check to ensure Create® 3 topics appear
ros2 topic listYou should get
/battery_state /cmd_audio /cmd_lightring /cmd_vel /dock /hazard_detection /imu /interface_buttons /ir_intensity /ir_opcode /kidnap_status /mouse /odom /parameter_events /rosout /slip_status /stop_status /tf /tf_static /wheel_status /wheel_ticks /wheel_vels -
Check if it reads a message on a topic
ros2 topic echo battery_stateYou should see continuous repetition of output like following.
header:
  stamp:
    sec: 1683568887
    nanosec: 488023084
  frame_id: ''
voltage: 16.56999969482422
temperature: 36.95000076293945
current: 0.5609999895095825
charge: 2.075000047683716
capacity: 2.1500000953674316
design_capacity: 2.1500000953674316
percentage: 0.9700000286102295
power_supply_status: 0
power_supply_health: 0
power_supply_technology: 0
present: true
cell_voltage: []
cell_temperature: []
location: ''
serial_number: ''
---